Orchestrating a Fraud Detection Model Lifecycle with cuDF, Prefect, MLflow, and Triton#
June, 2026
A production MLOps pipeline for the NVIDIA Financial Fraud Detection AI Blueprint, built with Prefect, MLflow, and Triton Inference Server.
The blueprint provides a notebook that manually walks through data preprocessing, GNN + XGBoost model training, Triton serving, and inference evaluation. This example takes that workflow and wraps each stage in automated orchestration with experiment tracking and continuous deployment for a production-ready model lifecycle implementation.
What the Blueprint Does#
The blueprint notebook can be divided into 4 steps:
Load and preprocess 24M credit card transactions from the IBM TabFormer dataset using cuDF, building a bipartite User ↔ Merchant graph where edges represent transactions
Train a 2-hop SAGEConv GNN that produces node embeddings, then an XGBoost classifier on those embeddings for edge classification (To determine fraudulent transactions)
Serve the trained model on Triton Inference Server with a custom Python backend
Evaluate by sending held-out test data to Triton and computing F1, precision, recall, and accuracy
In the blueprint notebook, each step is a notebook cell that you run manually and inspect the output. However, in a production scenario, there is a need for orchestration, experiment tracking, model versioning, and automated deployment.
The aim of this workflow example is to make this flow production-ready by adding the following components:
Orchestration: Prefect flows chain the stages together, track runs, and handle failures
Experiment tracking: MLflow logs hyperparameters, model artifacts, and evaluation metrics for every run
Continuous deployment: champion/challenger evaluation via Triton’s native model versioning, with automatic promotion or rollback
Architecture#
Similar to the structure of the notebook, the production pipeline has four stages, each implemented as a Prefect flow composed of reusable tasks:
full_pipeline_flow
├── preprocess_flow    →  cuDF graph formation + MLflow metadata logging
├── train_flow         →  NGC training container + MLflow experiment logging
├── evaluate_flow      →  Triton champion/challenger scoring + MLflow metrics
└── deploy_flow        →  Promote or rollback + MLflow model registry
The full pipeline runs all four as subflows in sequence, passing results between them. Each stage can also run independently for ad-hoc experiments.
MLOps Components#
Three services support the pipeline, all running as Docker containers via docker-compose.yml:
Service |
Role |
Port |
|---|---|---|
Prefect |
Flow orchestration, run tracking, scheduling, UI |
4200 |
MLflow |
Experiment tracking, artifact storage, model registry |
5050 |
Triton |
GPU inference, model versioning, model control API |
8000/8001/8002 |
Champion/Challenger via Triton Native Versioning#
The evaluation stage uses Triton’s built-in model versioning for zero-downtime model comparison. Triton’s model repository supports multiple version directories (1/, 2/, 3/…), and with version_policy: { all: {} } in config.pbtxt, all versions are served simultaneously.
Component Structure#
fraud-detection-mlops/
├── pipeline/
│   ├── config.py              Paths, service URLs, hyperparameters, thresholds
│   ├── deployments.py         Register flows with work pools and schedules
│   ├── flows/
│   │   ├── preprocess.py      Stage 1: cuDF graph formation + MLflow
│   │   ├── train.py           Stage 2: NGC container + MLflow logging
│   │   ├── evaluate.py        Stage 3: Triton versioning + champion/challenger scoring
│   │   ├── deploy.py          Stage 4: promote or rollback
│   │   └── full_pipeline.py   Orchestrator: chains all stages as subflows
│   └── tasks/
│       ├── data.py            Test data loading for evaluation
│       ├── training.py        Config generation + Docker container lifecycle
│       ├── mlflow_utils.py    Experiment tracking + model registry
│       └── triton.py          Version staging, model reload, inference scoring
├── scripts/
│   ├── preprocess_tabformer.py    cuDF preprocessing (adapted from blueprint)
│   └── download_data.sh           TabFormer dataset download helper
├── triton/
│   └── Dockerfile                 Custom Triton image with PyTorch, XGBoost GPU, PyG
├── docker-compose.yml             MLflow + Prefect + Triton services
├── environment.yml                Conda environment (RAPIDS + pipeline deps)
└── .env.example                   Configuration template
The tasks/ layer contains reusable units of work (data loading, container execution, MLflow logging, Triton management). The flows/ layer composes tasks into pipeline stages. This separation is important for scaling: tasks can be distributed across workers and work pools, while flows define the orchestration logic.
Prerequisites#
NVIDIA GPU with compute capability 7.5 or newer (Turing architecture or later: T4, A10, L4, A100, H100, etc.). Required by the training container.
Docker with the NVIDIA Container Toolkit for GPU access.
Conda: miniforge is recommended.
NGC API key from the NVIDIA NGC API key page, required to pull the training container.
Provision a GPU instance with NVIDIA Brev#
Use NVIDIA Brev to provision a GPU instance for this example. Brev provisions GPU instances across AWS, GCP, and other cloud service providers, with NVIDIA drivers, Docker, and the NVIDIA Container Toolkit pre-installed.
See Documentation
Follow the instructions in NVIDIA Brev to launch an instance with:
GPU: a single GPU meeting the Prerequisites above.
Host memory: at least 64 GB of RAM so the cuDF preprocessing comfortably fits the 24 M-row TabFormer dataset in memory.
Disk: at least 100 GB. The training container is ~40 GB on disk, the Triton image is ~24 GB, and the TabFormer dataset adds another ~5 GB.
Runtime: VM Mode w/ Jupyter. The docker-compose stack started in the Setup section below manages MLflow, Prefect, and Triton.
Once the instance is running, SSH in with brev shell <instance-id> or open it in VS Code via brev open <instance-id>.
Install miniforge#
The Brev VM image ships with Docker and CUDA but not conda. Install miniforge:
$ curl -L -O "https://github.com/conda-forge/miniforge/releases/latest/download/Miniforge3-$(uname)-$(uname -m).sh"
$ bash Miniforge3-$(uname)-$(uname -m).sh -b -p $HOME/miniforge
$ $HOME/miniforge/bin/conda init bash
$ source ~/.bashrc
From here, continue with the Setup section below.
Setup#
Fetch the scripts and helper files onto the Brev instance and switch to the example directory:
$ curl -sSL "https://github.com/rapidsai/deployment/archive/refs/heads/main.tar.gz" \
    | bsdtar -xzf - --strip-components=3 \
        "deployment-main/source/examples/fraud-detection-mlops-pipeline"
$ cd fraud-detection-mlops-pipeline
Configure#
Copy the environment template, set your NGC API key, and export the variables into the current shell:
$ cp .env.example .env
$ nano .env
$ set -a
$ source .env
$ set +a
Docker Compose reads .env automatically, but the host Python process only sees these values after they are exported into the shell. Repeat the set -a; source .env; set +a step in each new shell before running the Python flows.
Install Python dependencies#
All dependencies (RAPIDS, Prefect, MLflow, Triton client) are specified in environment.yml:
$ conda env create -f environment.yml
$ conda activate fraud-mlops
Download the TabFormer dataset#
The dataset is 266MB of synthetic credit card transactions (24M rows, 15 columns) from IBM TabFormer. Download transactions.tgz on your local machine from the IBM Box TabFormer data folder, then copy it to the Brev instance. If your browser downloads a cred_card.zip archive instead, unzip it locally and copy the transactions.tgz file inside.
On the Brev instance, create the raw data directory:
$ mkdir -p ./data/TabFormer/raw
From your local machine, use brev copy:
$ brev copy ./transactions.tgz <instance-id>:~/fraud-detection-mlops-pipeline/data/TabFormer/raw/transactions.tgz
Alternatively, open Jupyter on the Brev instance and drag transactions.tgz into fraud-detection-mlops-pipeline/data/TabFormer/raw/.
Back on the Brev instance, extract the dataset:
$ ./scripts/download_data.sh ./data/TabFormer
The helper script exits with instructions if transactions.tgz is not in ./data/TabFormer/raw/ yet.
Pull the training container#
$ echo "$NGC_API_KEY" | docker login nvcr.io --username '$oauthtoken' --password-stdin
$ docker pull nvcr.io/nvidia/cugraph/financial-fraud-training:2.0.0
Build the Triton serving image#
The custom Triton image (triton/Dockerfile) installs PyTorch 2.7, XGBoost 3.0 (GPU), PyTorch Geometric 2.6, and Captum on top of the Triton 25.04 base image:
$ docker build -t triton-fraud:latest triton/
This build takes 15-20 minutes and produces a ~24GB image.
Start the MLOps Components#
Create the host-side bind mount directories before starting Docker Compose. This keeps Docker from creating missing directories as root, which would prevent the host Python process from staging Triton model versions later.
$ mkdir -p ./data/models ./data/trained_models ./mlflow-data ./prefect-data
For the end-to-end pipeline, start all three MLOps components Prefect, MLflow, and Triton:
$ docker compose --profile gpu up -d
If you only want to run preprocessing or training, Triton is not required. In that case, start only Prefect and MLflow:
$ docker compose up -d
If you change the Compose configuration or rebuild the Triton image, recreate the Triton container so the new environment is applied:
$ docker compose --profile gpu up -d --force-recreate triton
If a previous run created root-owned __pycache__ directories inside ./data/models, stop Triton, remove those bytecode directories, fix ownership, and recreate Triton before rerunning the pipeline:
$ docker compose --profile gpu stop triton
$ sudo find ./data/models -type d -name __pycache__ -prune -exec rm -rf {} +
$ sudo chown -R "$USER:$USER" ./data/models
$ docker compose --profile gpu up -d --force-recreate triton
Verify the services are running from the Brev shell:
$ curl -fsS http://127.0.0.1:4200/api/health
$ curl -fsS http://127.0.0.1:5050/health
$ curl -fsS http://127.0.0.1:8000/v2/health/ready
To open the UIs in your local browser, run port forwarding commands from your local machine and keep them running while you use the pages:
$ brev port-forward <instance-id> -p 4200:4200
$ brev port-forward <instance-id> -p 5050:5050
Prefect UI: http://localhost:4200
MLflow UI: http://localhost:5050
Running the Pipeline#
Full pipeline#
Run all four stages end-to-end:
$ python -m pipeline.flows.full_pipeline
This chains preprocessing → training → evaluation → deployment as subflows, passing results between stages automatically. If graph data already exists from a previous preprocessing run, skip preprocessing with:
$ python -c 'from pipeline.flows.full_pipeline import full_pipeline_flow; full_pipeline_flow(skip_preprocess=True)'
Individual stages#
Each stage can be run independently for debugging or ad-hoc experiments:
# Preprocess raw CSV into graph data
$ python -m pipeline.flows.preprocess

# Train with default hyperparameters
$ python -m pipeline.flows.train

# Evaluate a specific training run
$ python -m pipeline.flows.evaluate <mlflow_run_id>

# Deploy based on evaluation result
$ python -m pipeline.flows.deploy '{"should_promote": true, ...}'
Experimenting with hyperparameters#
To try different model configurations, pass custom hyperparameters to the train flow:
from pipeline.flows.train import train_flow

run_id = train_flow(
    gnn_params={"hidden_channels": 64, "n_hops": 3, "num_epochs": 12, ...},
    xgb_params={"max_depth": 8, "num_boost_round": 1024, ...},
)
Each run is tracked in MLflow with full hyperparameters and metrics, making it straightforward to compare experiments. The evaluation stage will then score this new model against the current champion.
Test Inference#
After the deployment stage completes, the current champion model is served by Triton. First confirm Triton exposes the model metadata:
$ curl -fsS http://127.0.0.1:8000/v2/models/prediction_and_shapley | python -m json.tool
Then send held-out graph data to the served model and print the inference metrics:
$ python - <<'PY'
import json
import numpy as np

from pipeline.config import (
    DECISION_THRESHOLD,
    TEST_DATA_DIR,
    TRITON_HTTP_URL,
    TRITON_MODEL_NAME,
    TRITON_MODEL_REPO,
)
from pipeline.tasks.data import load_test_data
from pipeline.tasks.triton import get_current_version, score_model_version

test_data = load_test_data.fn(TEST_DATA_DIR)
labels = test_data["edge_label_user_to_merchant"]
if hasattr(labels, "to_numpy"):
    labels = labels.to_numpy(dtype=np.int32)
if hasattr(labels, "values"):
    labels = labels.values
labels = np.asarray(labels, dtype=np.int32).ravel()

inference_data = {
    key: value for key, value in test_data.items()
    if not key.startswith("edge_label_")
}
version = get_current_version.fn(TRITON_MODEL_REPO, TRITON_MODEL_NAME)
metrics = score_model_version.fn(
    TRITON_HTTP_URL,
    TRITON_MODEL_NAME,
    version,
    inference_data,
    labels,
    DECISION_THRESHOLD,
)

print(f"Served model: {TRITON_MODEL_NAME} version {version}")
print(json.dumps(metrics, indent=2))
PY
This sends real model inputs to Triton, receives PREDICTION, and computes F1, precision, recall, and accuracy of the served model.
Monitoring and Logging#
Prefect UI#
The Prefect UI at port 4200 tracks every flow run. Here is a completed full pipeline run showing the three subflows (train, evaluate, deploy) with their execution timeline:
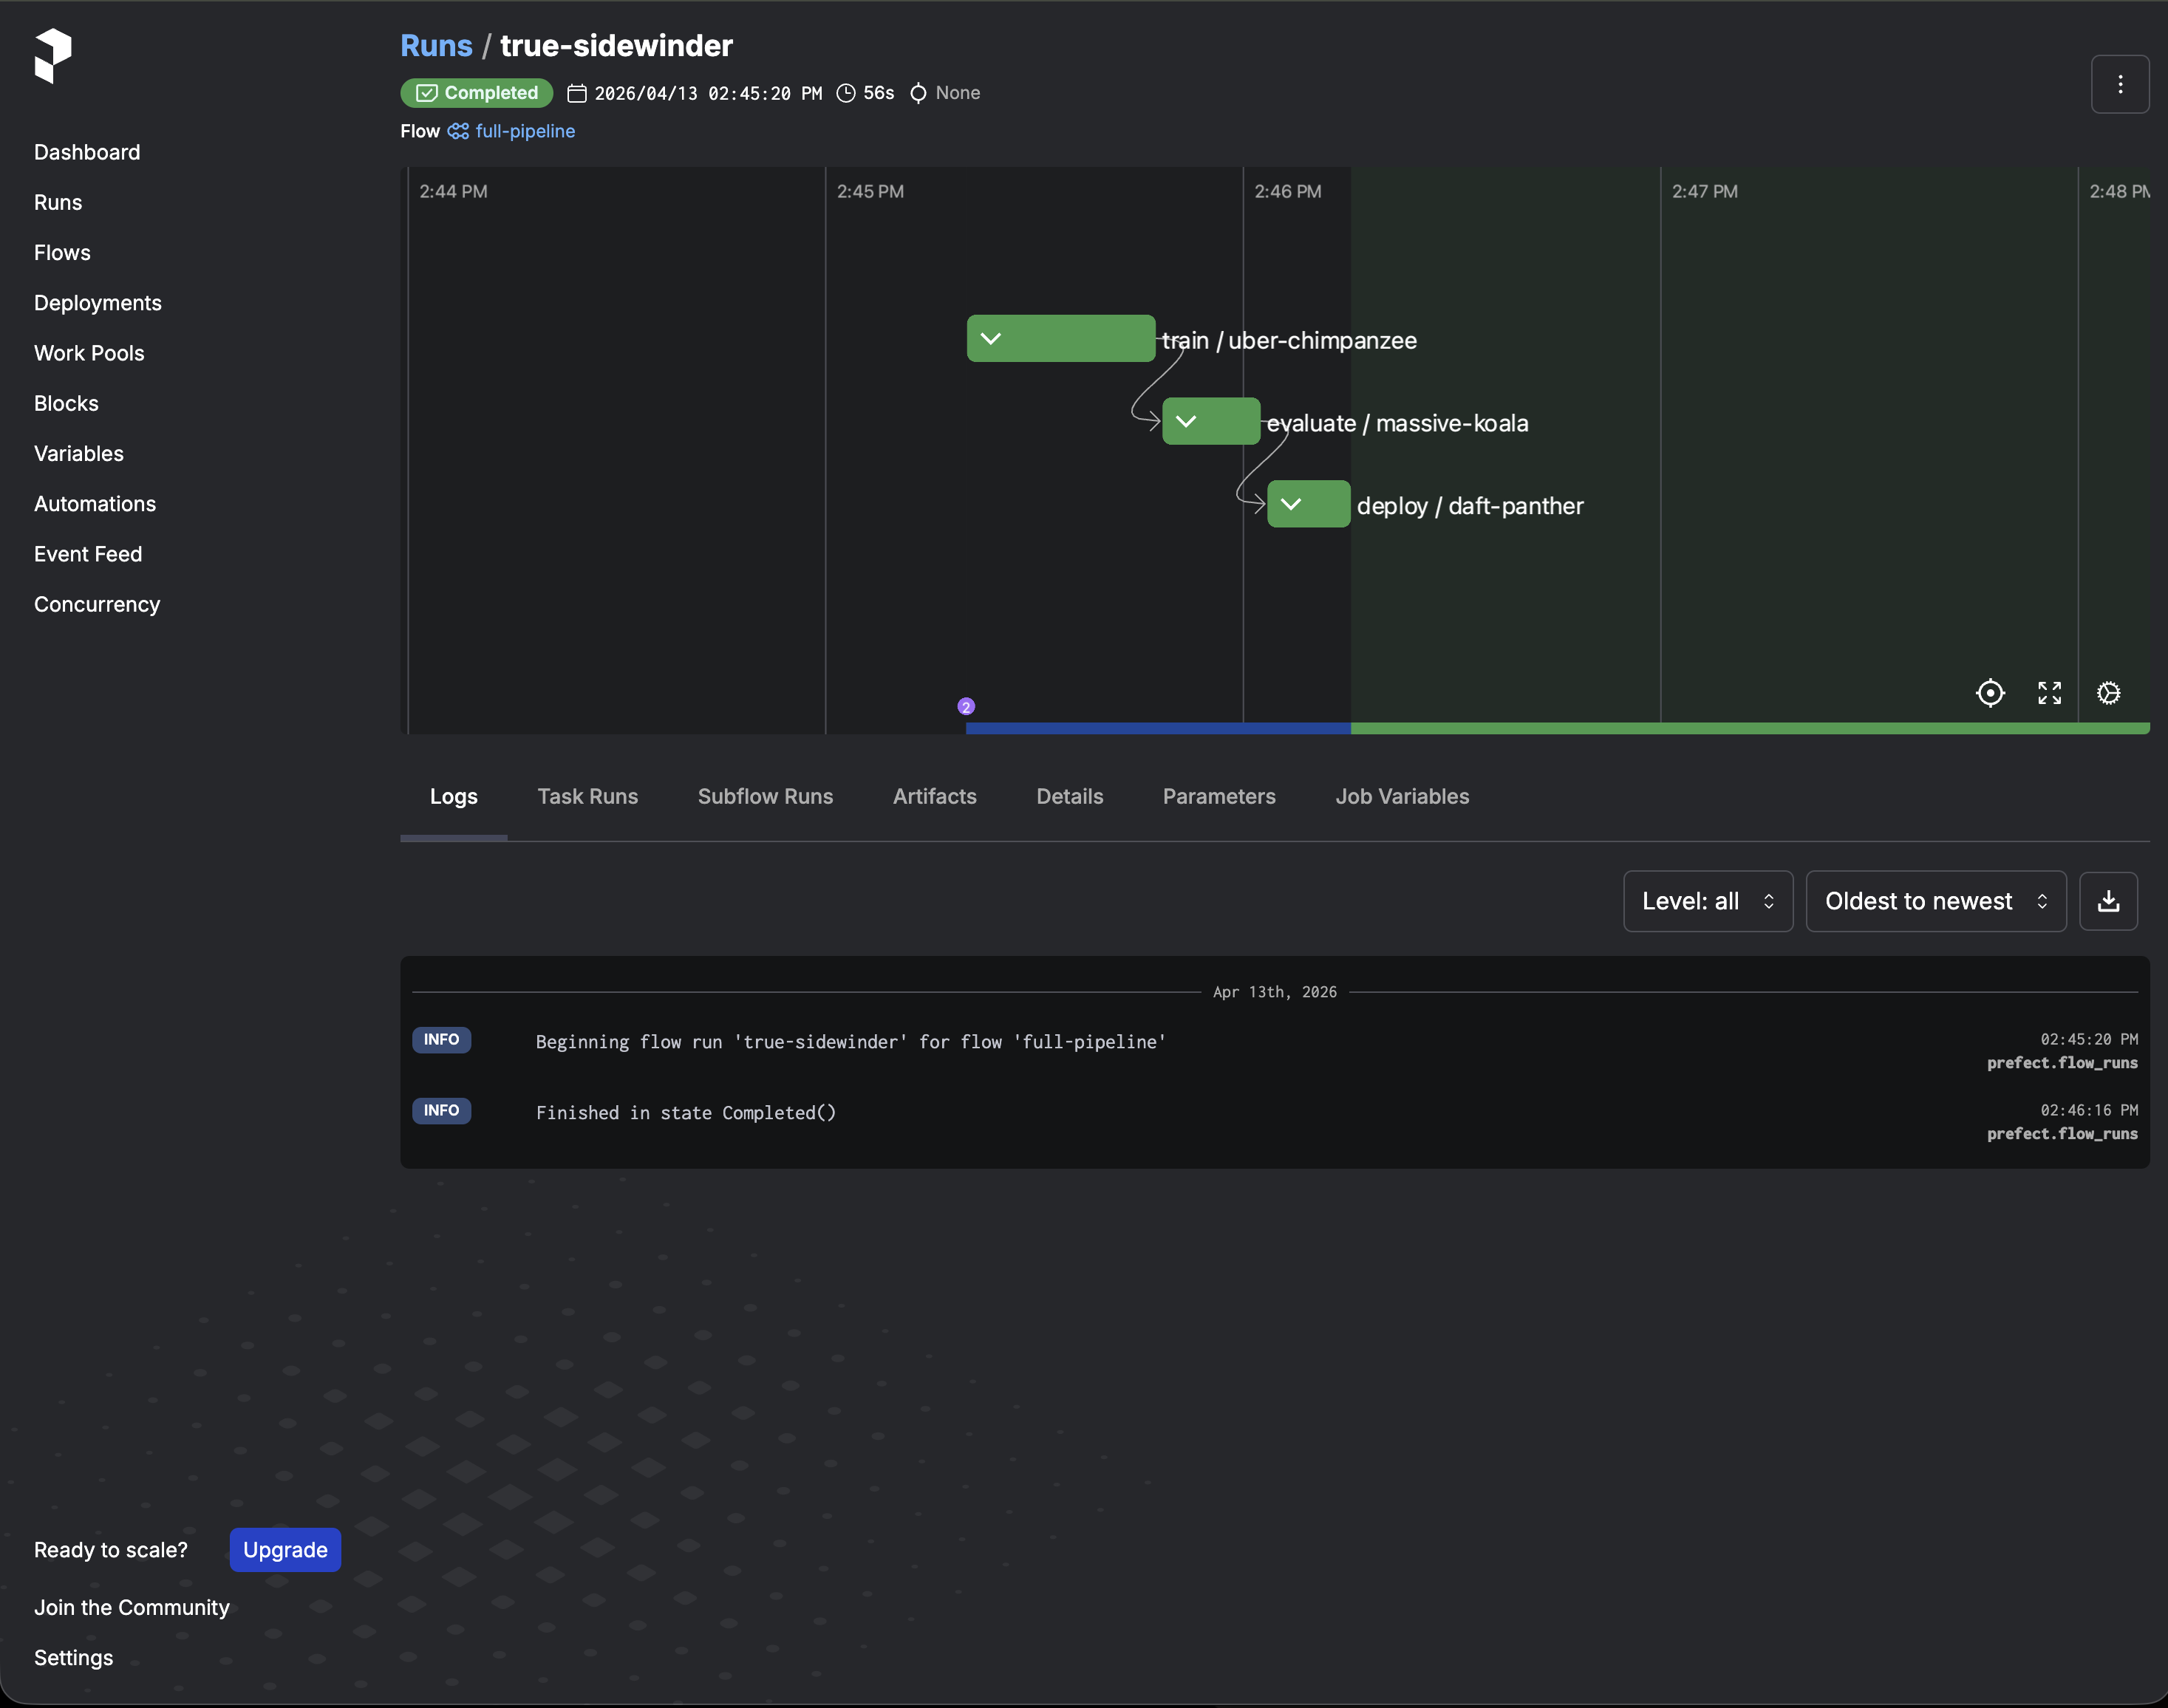
The UI also shows task-level logs from each step, which is useful for debugging container failures or Triton connection issues.
MLflow UI#
The MLflow UI at port 5050 tracks experiments across runs. The experiment table shows all training runs with their hyperparameters and evaluation metrics side by side:

Clicking into a run shows the full details: all GNN and XGBoost hyperparameters, challenger and champion metrics, deltas, and the promotion decision:

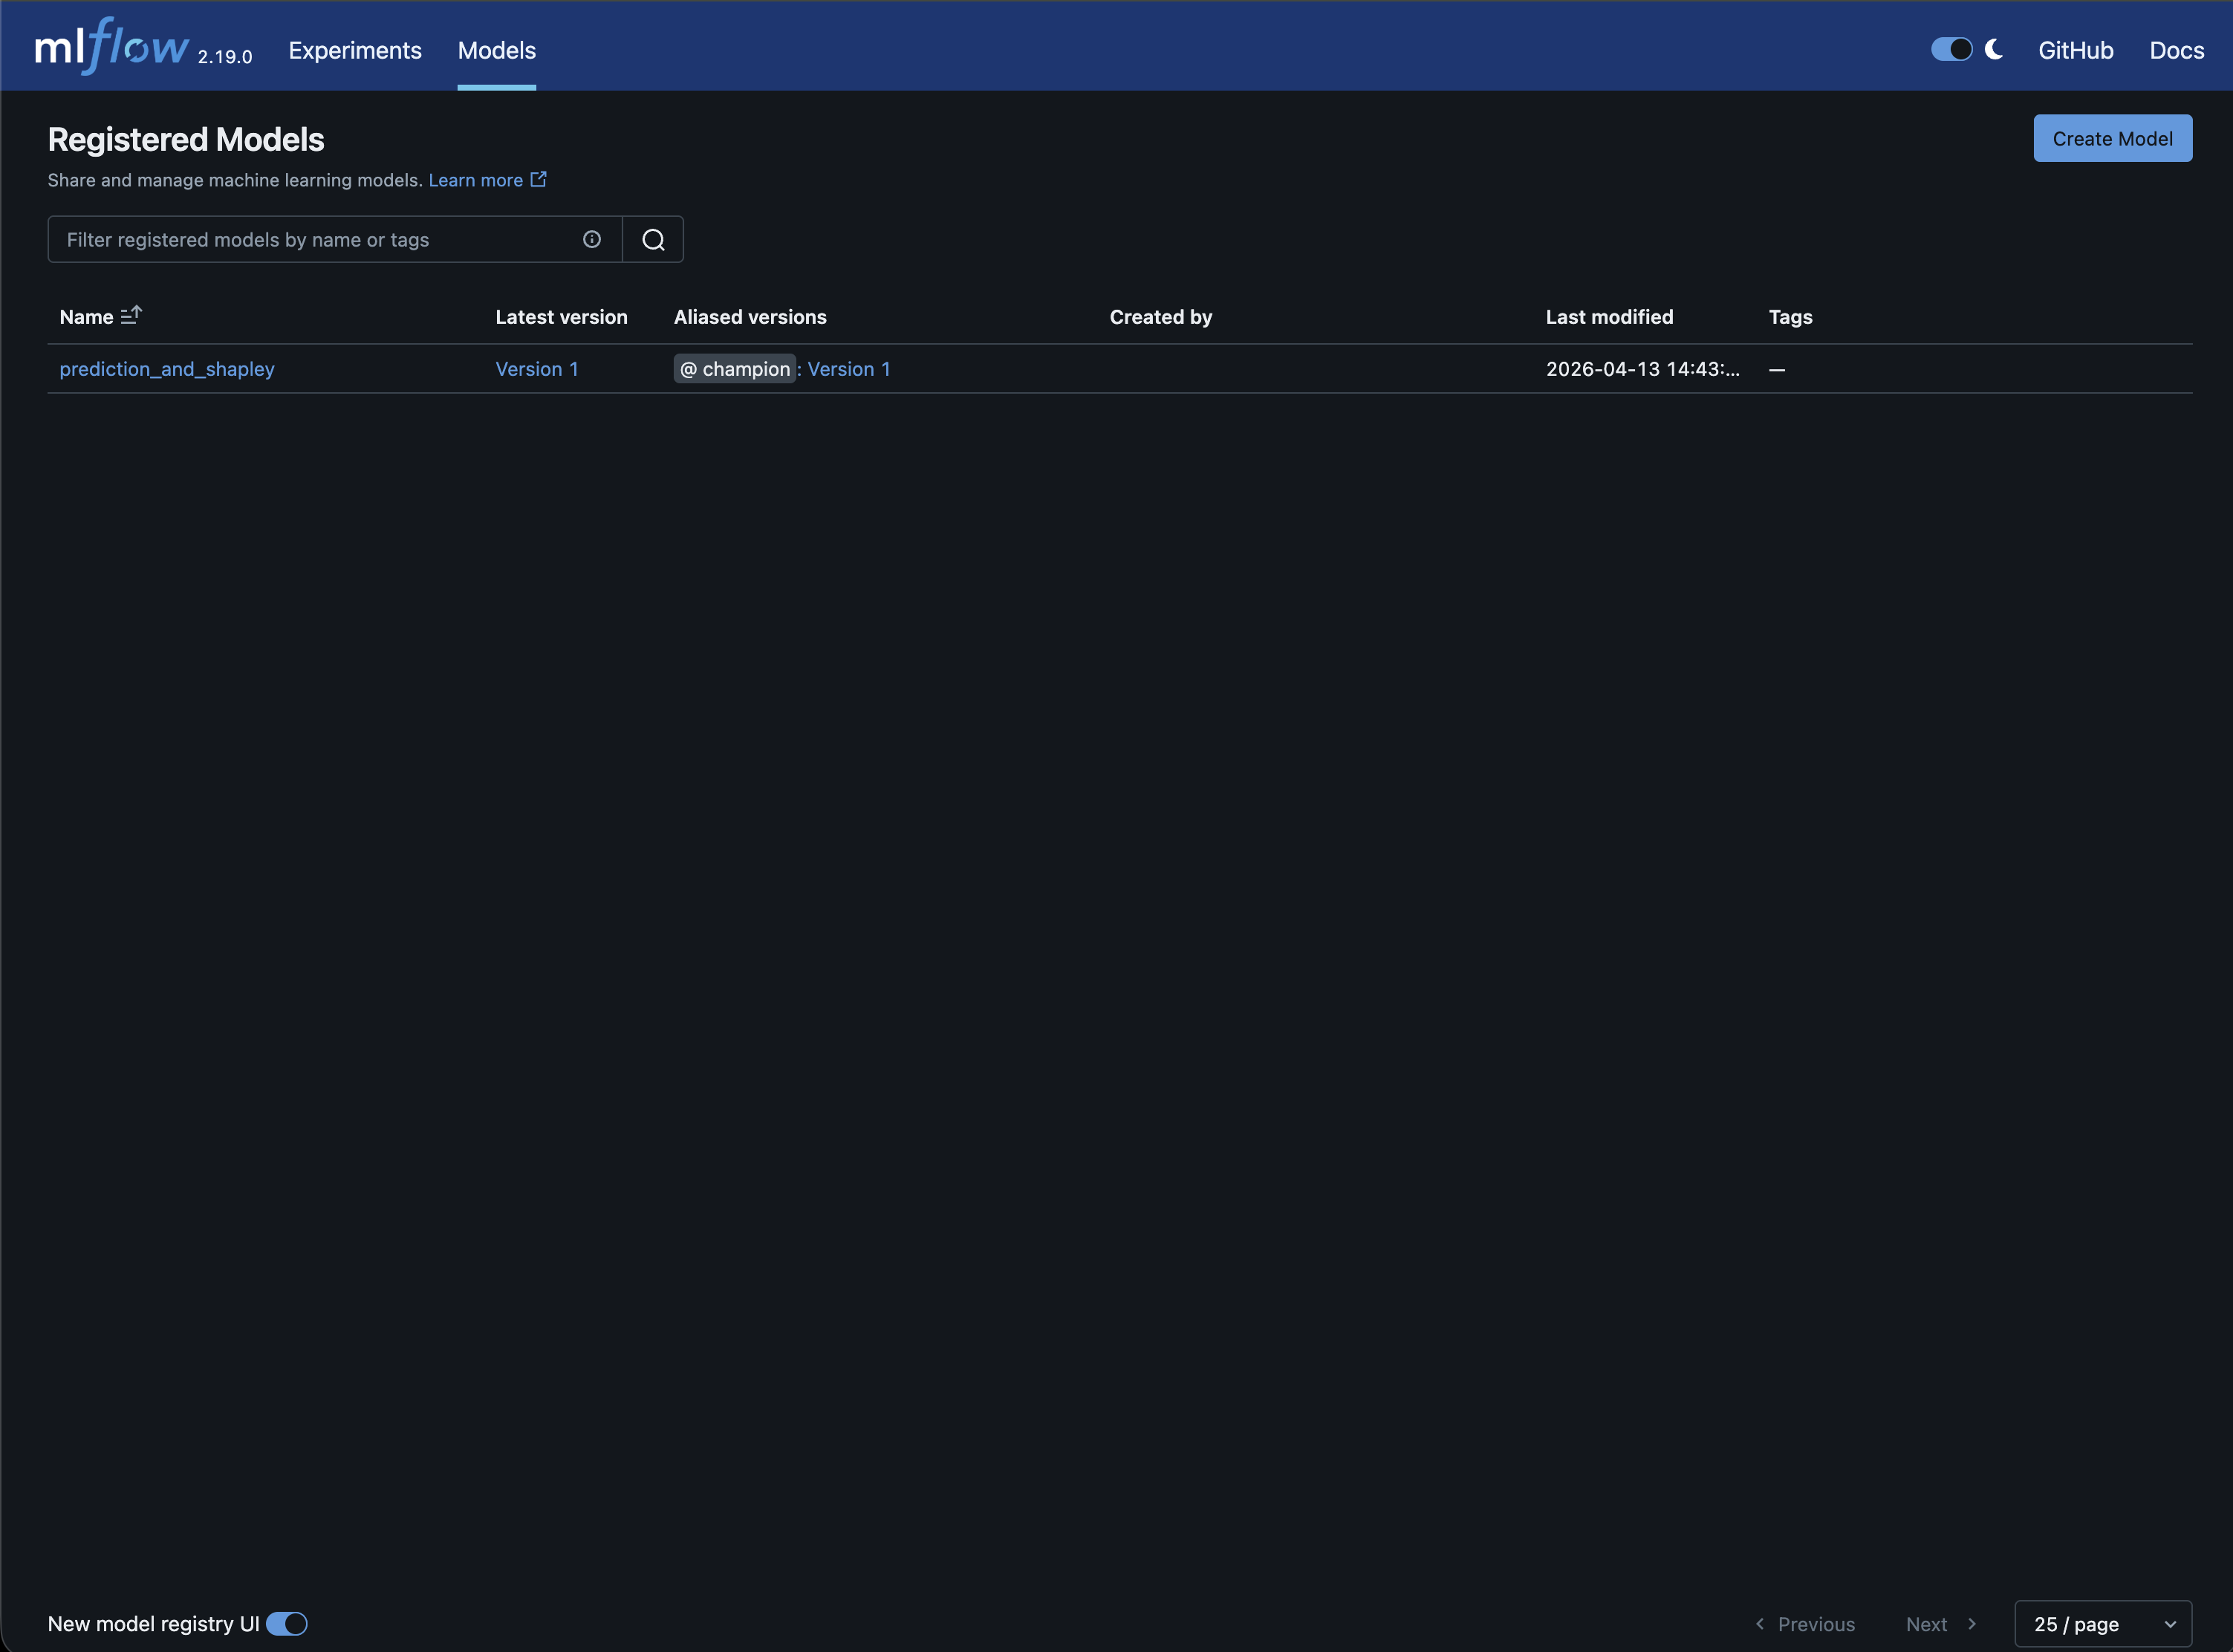
The model registry tracks which version is in production. The champion alias always points to the current production model:
In a typical production cycle, start with a full pipeline run to establish a baseline champion. From there, the cycle is: tweak hyperparameters, run training and evaluation, and check the MLflow experiment table to compare the challenger against the current champion. Promoted models are immediately live in Triton without any need for a manual deployment.
Pipeline Stage Architecture#
The sections below explain what each pipeline stage does after you have run the end-to-end workflow and verified inference.
Preprocessing#
Flow: pipeline/flows/preprocess.py | Script: scripts/preprocess_tabformer.py
The preprocessing stage takes the raw TabFormer CSV and produces graph-structured data for the GNN training container.
The script (scripts/preprocess_tabformer.py, adapted from the blueprint’s preprocess_TabFormer_lp.py) uses cuDF for the following GPU-accelerated DataFrame operations on the 24M-row dataset:
Clean column names: strip spaces, standardize field names
Encode categorical features: one-hot encoding for low-cardinality fields (< 8 categories), binary encoding for high-cardinality fields
Build the bipartite graph: Users and Merchants become nodes, each transaction becomes an edge with encoded attributes and a fraud/not-fraud label
Undersample: balance the dataset to a configurable fraud ratio (default 10%)
Split by year: pre-2018 for training, 2018 for validation, post-2018 for testing
Write CSVs: node features, edge indices, edge attributes, edge labels, and feature masks to
gnn/andgnn/test_gnn/
The Prefect flow wraps this script and logs preprocessing metadata (row counts, graph dimensions) to MLflow:
# pipeline/flows/preprocess.py
@flow(name="preprocess", log_prints=True)
def preprocess_flow(
    raw_csv_path: str = RAW_CSV_PATH,
    output_base_path: str = DATA_ROOT,
    fraud_ratio: float = DEFAULT_FRAUD_RATIO,
    under_sample: bool = DEFAULT_UNDER_SAMPLE,
) -> dict:
    # Step 1: Run preprocessing (import here because it requires cuDF/GPU)
    scripts_dir = os.path.join(os.path.dirname(__file__), "..", "..", "scripts")
    sys.path.insert(0, os.path.abspath(scripts_dir))
    from preprocess_tabformer import preprocess_data

    metadata, user_mask_map, mx_mask_map, tx_mask_map = preprocess_data(
        raw_csv_path=raw_csv_path,
        output_base_path=output_base_path,
        fraud_ratio=fraud_ratio,
        under_sample=under_sample,
    )

    # Step 2: Log to MLflow
    experiment_id = get_or_create_experiment(MLFLOW_PREPROCESS_EXPERIMENT_NAME)
    with mlflow.start_run(experiment_id=experiment_id, run_name="preprocess"):
        mlflow.log_params(
            {
                "preprocess.fraud_ratio": fraud_ratio,
                "preprocess.under_sample": under_sample,
            }
        )
        mlflow.log_metrics(
            {
                "preprocess.row_count": float(metadata["row_count"]),
                "preprocess.num_users": float(metadata["num_users"]),
                "preprocess.num_merchants": float(metadata["num_merchants"]),
                "preprocess.num_transactions": float(metadata["num_transactions"]),
            }
        )
        mlflow.set_tag("stage", "preprocess")
Training#
Flow: pipeline/flows/train.py | Tasks: pipeline/tasks/training.py, pipeline/tasks/mlflow_utils.py
Training uses NVIDIA’s financial-fraud-training:2.0.0 NGC container for training. The pipeline generates the config in the format the container expects, runs the container, and collects the artifacts.
Config generation#
The generate_training_config task builds a JSON config from the flow’s hyperparameters:
# pipeline/config.py
DEFAULT_GNN_PARAMS = {
    "hidden_channels": 32,
    "n_hops": 2,
    "layer": "SAGEConv",
    "dropout_prob": 0.1,
    "batch_size": 4096,
    "fan_out": 10,
    "num_epochs": 8,
}

DEFAULT_XGB_PARAMS = {
    "max_depth": 6,
    "learning_rate": 0.2,
    "num_parallel_tree": 3,
    "num_boost_round": 512,
    "gamma": 0.0,
}
Container execution#
The run_training_container task runs the NGC container with volume mounts for graph data, output directory, and config:
$ docker run --rm --gpus device=0 \
    --cap-add SYS_NICE --shm-size=8g --privileged \
    -v <graph-data-dir>:/data \
    -v <trained-models-dir>:/trained_models \
    -v <training-config.json>:/app/config.json \
    --entrypoint bash \
    nvcr.io/nvidia/cugraph/financial-fraud-training:2.0.0 \
    -c "torchrun --standalone --nproc_per_node=1 /app/main.py --config /app/config.json"
The actual script also includes various NCCL environment variables (NCCL_IB_DISABLE, NCCL_NET=Socket, etc.) which are a workaround for instances without InfiniBand hardware. The container is bundled with UCX that is designed for faster HPC networking, which is not usually available on standard single GPU instances.
Note
If running on an InfiniBand-enabled system (DGX, HPC cluster), remove the NCCL environment variables from pipeline/tasks/training.py. These overrides disable InfiniBand, NVLink, and shared memory transports. On hardware that supports them, NCCL auto-detects and uses the optimal transport without any configuration.
MLflow logging#
After training completes, the flow logs everything to MLflow:
Hyperparameters:
gnn.hidden_channels,gnn.n_hops,xgb.max_depth,xgb.num_boost_round, etc.Artifacts: the training config JSON and the full model directory
Tags:
trigger: automated(or custom tags for ad-hoc experiments)
The flow returns the MLflow run ID, which the evaluation stage uses to associate metrics with the same run.
Evaluation#
Flow: pipeline/flows/evaluate.py | Tasks: pipeline/tasks/triton.py, pipeline/tasks/data.py
The evaluation stage compares the newly trained model (challenger) against the currently deployed model (champion) using Triton’s native versioning.
Staging the challenger#
The stage_challenger_version task copies the new model’s artifacts as the next version directory in Triton’s model repository. If the champion is version 1, the challenger becomes version 2:
prediction_and_shapley/
├── 1/          ← champion (currently serving)
│   ├── model.py
│   ├── state_dict_gnn_model.pth
│   └── embedding_based_xgboost.json
├── 2/          ← challenger (just staged)
│   ├── model.py
│   ├── state_dict_gnn_model.pth
│   └── embedding_based_xgboost.json
└── config.pbtxt  (version_policy { all {} })
The task also copies the generated root config.pbtxt from the training output repository into the serving repository and ensures it has version_policy { all {} } so Triton serves both versions simultaneously. Without this, Triton defaults to latest: { num_versions: 1 } and would drop the champion when the challenger is loaded.
Scoring#
After reloading the model in Triton, the flow loads the held-out test data (25,803 samples, ~8% fraud) and sends it to both versions using Triton’s version-specific inference:
# pipeline/tasks/triton.py
response = client.infer(
    model_name,
    inputs=inputs,
    model_version=str(version),
    outputs=outputs,
)
Each version returns fraud probability scores. The task applies a decision threshold (default 0.5) and computes F1, precision, recall, and accuracy against the ground truth labels.
Promotion decision#
The flow compares the challenger’s F1 score against the champion’s. Promotion requires the challenger to exceed the champion by at least min_improvement (default 0.0):
challenger_val = challenger_metrics.get(promotion_metric, 0)
champion_val = champion_metrics.get(promotion_metric, 0)
should_promote = challenger_val > champion_val + min_improvement
Both sets of metrics, the deltas, and the promotion decision are logged to the same MLflow run that was created during training.
Deployment#
Flow: pipeline/flows/deploy.py
The deployment stage acts on the evaluation result.
If the challenger wins (promote)#
Remove the old champion’s version directory from the model repository
Reload the model in Triton (only the challenger version remains)
Run a health check to verify the new champion is responsive
Register the model version in MLflow’s model registry and assign the
championalias
If the health check fails, the flow raises an error. This surfaces in Prefect as a failed run that you can investigate.
If the champion wins (reject)#
Remove the challenger’s version directory
Reload Triton to restore the champion-only state
In both cases, Triton ends up serving exactly one version: the winner. The MLflow model registry provides an authoritative record of which model version is in production via the champion alias:
# pipeline/tasks/mlflow_utils.py
_create_registered_model_if_missing(client, model_name)
model_uri = f"runs:/{run_id}/model"
mv = client.create_model_version(name=model_name, source=model_uri, run_id=run_id)
client.set_registered_model_alias(model_name, "champion", mv.version)
Scaling to Multiple Machines#
The default Brev walkthrough runs Prefect, MLflow, Triton, and all Python flows on one GPU instance. That is the simplest path for this example and is the recommended setup when you are validating the workflow end to end.
For production-style orchestration, you can split the MLOps tracking components (which do not require access to a GPU) from the GPU execution machine. In that setup, pipeline/deployments.py registers each flow as a Prefect deployment with its own work pool and schedule.
How it works#
The evaluation and deployment stages need both filesystem access to Triton’s model repository and HTTP access to the Triton API. As a result, the GPU instance needs to run Triton and the Prefect worker. The central host only runs Prefect and MLflow so that flow orchestration, experiment tracking, and the UIs are available from the host.
The split-machine setup uses two machines:
Orchestration host: runs Prefect and MLflow servers. This machine does not need a GPU.
GPU instance: runs the Prefect worker, executes all pipeline flows, and serves models with Triton.
On Brev, the easiest way to view the UIs is still to keep Prefect and MLflow on the GPU instance and forward the UI ports to your local machine:
$ brev port-forward <instance-id> -p 4200:4200
$ brev port-forward <instance-id> -p 5050:5050
Use the split-machine setup only when the GPU instance can reach the orchestration host on ports 4200 and 5050. That usually requires a shared private network, VPN, public endpoint, or reverse tunnel.
Setting up deployments#
1. Start Prefect and MLflow on the orchestration host:
$ docker compose up -d
This starts Prefect on port 4200 and MLflow on port 5050. Both UIs are available from that host.
2. Point the GPU instance at the orchestration host by setting the API URLs:
# On the GPU instance
$ export PREFECT_API_URL=http://<orchestration-host>:4200/api
$ export MLFLOW_TRACKING_URI=http://<orchestration-host>:5050
3. Start Triton on the GPU instance:
$ docker compose --profile gpu up -d triton
4. Create the work pool (run once, from the orchestration host):
$ prefect work-pool create gpu --type process
5. Register and serve all deployments from the GPU instance, after exporting PREFECT_API_URL and MLFLOW_TRACKING_URI:
$ python -m pipeline.deployments
This registers 5 deployments. Simulating a real world scenario, preprocessing runs at midnight to rebuild graph data from the latest raw CSV, and the full pipeline runs at 2am (after preprocessing completes) to retrain, evaluate, and potentially deploy a new champion. The individual stages are on-demand for ad-hoc experiments:
preprocess(gpu pool, nightly at midnight)train(gpu pool, on-demand)evaluate(gpu pool, on-demand)deploy(gpu pool, on-demand)full-pipeline(gpu pool, nightly at 2am)
6. Start a worker on the GPU instance:
$ prefect worker start --pool gpu
You can trigger runs from the Prefect UI on the orchestration host or via the CLI:
$ prefect deployment run full-pipeline/full-pipeline
The components of the pipeline do not change between single-machine and split-machine modes. The difference is that flow runs are tracked and triggered via the central Prefect server, while all execution still happens on the GPU instance.
Data ingestion in production#
This example uses a static CSV (card_transaction.v1.csv), but in a production scenario, new data arrives continuously. The preprocessing flow accepts a raw_csv_path parameter, which serves as the integration point with your data infrastructure. Common patterns on how newer data is fetched include:
Scheduled ETL jobs. An upstream pipeline (Spark, Airflow, dbt) lands a fresh CSV or Parquet file at a known path on a schedule. The preprocessing cron picks it up at midnight.
Cloud storage pulls. Transaction data accumulates in S3 or GCS. A lightweight script or Prefect task pulls the latest file to the GPU instance before preprocessing runs.
Data warehouse queries. A scheduled query extracts new records since the last run and writes them to the expected path.
To integrate any of these, add your data fetching logic as a Prefect task at the start of the preprocessing flow. It runs as part of the same nightly cron schedule, so fresh data is pulled and processed in a single run without any additional orchestration.
Conclusion#
This example demonstrates how to take a ML experiment and build production infrastructure around it:
Prefect orchestrates the pipeline stages, tracks runs, and enables scheduling
MLflow tracks every experiment (hyperparameters, artifacts, metrics) and manages the model registry
Triton serves models with native versioning, enabling champion/challenger evaluation without separate infrastructure
The same patterns (flow orchestration, experiment tracking, versioned deployment) broadly apply to any ML production scenario where you need to automate training, compare model versions, and deploy the winner.